• A layer is basically transparency stacked on top of one another • Layer features are available in Layer Panel @ top right which is also dockable • When you open a image, a new layer will be created. Everything you will do on GIMP is doing through layers • By default, this layer does not have a transparency on it. To add transparency, in the Layer Panel:
# Add transparency to image Right click > Add Alpha Channel
◇ When you erase something off the image, you can see the checker board items and this represents transparency in your image • The numbers of layers that you can use depends on the amount of your system memory • Stacking Order: The layer on the top will be displayed over whatever layer is below it • To keep the layers intact, save the image as .XCF (GIMP native format) • Layers can be of different sizes. They're not always the same size as the composition. The size of a layer is indicated by orange and black dotted lines • To make the layer the size of the entire composition
# Re-size layer to size of compoition # From pull-down menu Layer > Layer to Image Size # or Layer > Scale Layer
~~~~~~~~~~~~~~~~~~~~~~~~~~~~~~~~~
Add a New Layer
• There are several ways to add a new layer to an image: ◇ Click icon “Create New” at the bottom of the Layer Panel
◇ Open another file, drag and drop the file into the Canvas ◇ Copy and Paste an image into another image
~~~~~~~~~~~~~~~~~~~~~~~~~~~~~~~~~
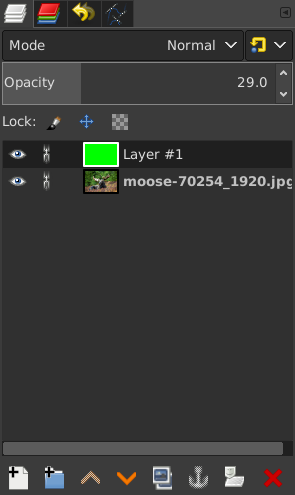
The Layer Panel
~~~~~~~~~~~~~~~~~~~~~~~~~~~~~~~~~
Transform Lock
• Group the layers together so that when you use a tool like Scale tool, you can apply the scale all layers that are grouped. Also good for animating gifs • To minimize quality loss when using transform tools, use interpolation NoHalo / LowHalo
# Reduce quality loss (Transform tool) Tools Options > Interpolation > LowHalo # or Tools Options > Interpolation > NoHalo
~~~~~~~~~~~~~~~~~~~~~~~~~~~~~~~~~
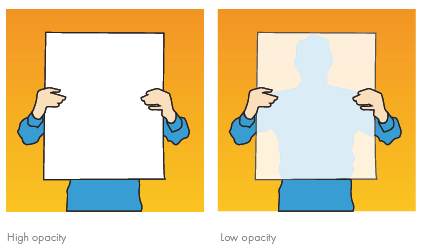
Opacity Slider
• Adjust transparency of the layer
~~~~~~~~~~~~~~~~~~~~~~~~~~~~~~~~~
Layer Mode
• Available in 2.10 and above. Drop down dialog • Layer mode is used to create blend mode so the layer on top can blend with the layer(s) below • Layer Mode Examples ◇ Soft Light ▪ Add layers in Orange creates warming effect. Blue creates cooling effect. and use Layer Mode “Soft Light”. You can adjust the effect with Opacity Slider as well ◇ Screen ▪ Get rid of all black pixels or the darker pixels. A quick way to get rid of the black background
~~~~~~~~~~~~~~~~~~~~~~~~~~~~~~~~~
Lock Features
• Lock the layers so you can't edit them. Different from Transform Lock • Found in Layer Panel ◇ Icon “Lock Pixels”: can't paint ◇ Icon “Move Lock”: can't move the layer ◇ Icon “Lock Alpha Channel”: block editing of alpha channel (transparency) e.g. can't user eraser to erase the layer
~~~~~~~~~~~~~~~~~~~~~~~~~~~~~~~~~
Layer Group
• Click and drag multiple layers into a layer group • Good for Web Page design • Can add its own Layer Mask and Layer Mode to a Layer Group ◇ Layer Mode: try "Overlay"
~~~~~~~~~~~~~~~~~~~~~~~~~~~~~~~~~
Layer Mask
• Allows you non-destructively (reversible) edit a layer • Can be applied to Layer Group as well • Usages ◇ Make changes apply to certain part of a image ◇ Make blending & fading effects with Gradient
• White creates opacity ◇ Use Black Paint tool on white Layer Mask: Show layer below ◇ Use White Paint tool on white Layer Mask: Show current layer
• Black creates transparency ◇ Use Black Paint tool on white Layer Mask: Show current layer ◇ Use White Paint tool on black Layer Mask: Show layer below • Selection ◇ Useful, used frequently ◇ Before using this option, use selection tool, when complete, hit enter ◇ Select this option and your selection will be shown in foreground while the rest of the layer below will be shown • Grayscale copy of layer ◇ Creates semi-transparent effect
~~~~~~~~~~~~~~~~~~~~~~~~~~~~~~~~~
Quick Mask
• A type of layer mask • How to use: ◇ To activate Quick Mask, click the square icon at the bottom left corner of the Canvas or use shortcut key shift-q ◇ Use paint tool to select an area (red is the unselected part) ◇ Click the square icon again to turn it off ◇ Add Layer Mask “Selection”
~~~~~~~~~~~~~~~~~~~~~~~~~~~~~~~~~
Differences with PhotoShop
• Unlike PhotoShop, GIMP does not contain adjustment layers, which means the image adjustments are typically made directly on your image layer • Unlike PhotoShop, GIMP will move any layer that you're hovered over, not just the active layer